

前回は、Docker Desktopをインストールしました。今回は、Dockerコンテナに親しむために、一番簡単な”hello-world”を表示するだけのDockerコンテナを利用しながら、前回、構築した環境が正しく機能しているかなどもチェックしながら、コンテナに親しんでみようと思います。
hello-worldを実行する。
それでは、さっそく実行してみようと思います。ターミナルを開いて、以下を入力してください。
$ docker run hello-world
Unable to find image 'hello-world:latest' locally
latest: Pulling from library/hello-world
0e03bdcc26d7: Pull complete
Digest: sha256:d58e752213a51785838f9eed2b7a498ffa1cb3aa7f946dda11af39286c3db9a9
Status: Downloaded newer image for hello-world:latest

Hello from Docker!
This message shows that your installation appears to be working correctly.

To generate this message, Docker took the following steps:
 1. The Docker client contacted the Docker daemon.
 2. The Docker daemon pulled the "hello-world" image from the Docker Hub.
    (amd64)
 3. The Docker daemon created a new container from that image which runs the
    executable that produces the output you are currently reading.
 4. The Docker daemon streamed that output to the Docker client, which sent it
    to your terminal.

To try something more ambitious, you can run an Ubuntu container with:
 $ docker run -it ubuntu bash

Share images, automate workflows, and more with a free Docker ID:
 https://hub.docker.com/

For more examples and ideas, visit:
 https://docs.docker.com/get-started/
上から順番に確認していきます。
Unable to find image 'hello-world:latest' locally
latest: Pulling from library/hello-world
0e03bdcc26d7: Pull complete
Digest: sha256:d58e752213a51785838f9eed2b7a498ffa1cb3aa7f946dda11af39286c3db9a9
Status: Downloaded newer image for hello-world:latest
docker runコマンドでは、hello-worldを指定して実行したので、hello-worldのイメージを探しにいくのですが、前回説明した中で出てきたローカルリポジトリ、リポジトリを参照します。メッセージに表示されているように、ローカルリポジトリ、リポジトリ(Docker Hub)の順で参照します。
Hello from Docker!
This message shows that your installation appears to be working correctly.

To generate this message, Docker took the following steps:
 1. The Docker client contacted the Docker daemon.
 2. The Docker daemon pulled the "hello-world" image from the Docker Hub.
    (amd64)
 3. The Docker daemon created a new container from that image which runs the
    executable that produces the output you are currently reading.
 4. The Docker daemon streamed that output to the Docker client, which sent it
    to your terminal.
Hello from Dockerが表示されています。このメッセージが表示されていれば、インストールは正しく完了しているそうです。このメッセージが表示されるまでの流れが記載されいるので、詳しく読んで見ましょう。
もう少し掘り下げてみてみましょう
- Docker クライント(Docker コマンド)がDockerデーモンへ接続する。
- Dockerデーモンは、”hello-world”イメージをDocker Hubから取得する
- Dockerデーモンは、イメージから実行可能なコンテナを生成し、このメッセージが表示される。
- Dockerデーモンは、コンテナの出力をdockerクライントへ送り、ターミナル上にメッセージが表示される。
前回、説明したdockerのアーキテクチャ図に、docker run hello-worldの挙動をマッピングしてみました。
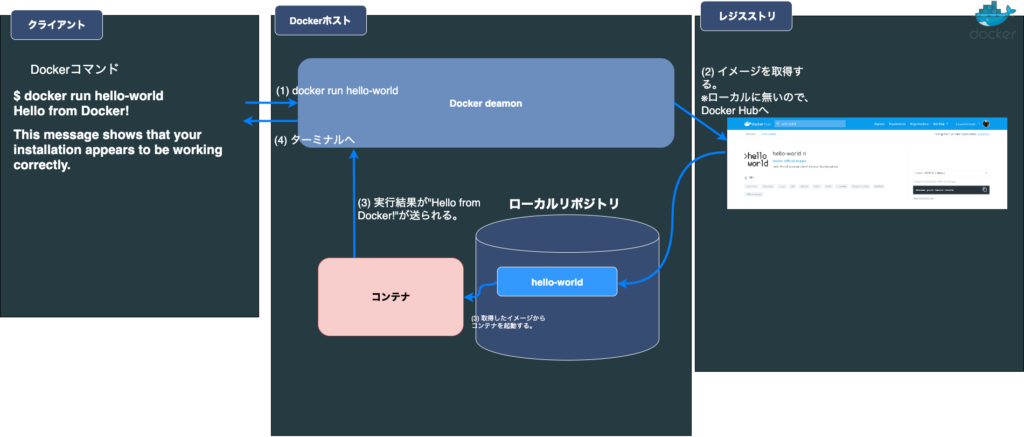
- ターミナルで
docker run hello-wrodを実行するとdockerデーモンに接続されます。 hello-worldというリポジトリをローカルに探しに行きますが、存在しないので、
Docker Hub(https://hub.docker.com/_/hello-world)からイメージを取得し、ローカルリポジトリへプルします。- dockerデーモンがイメージからコンテナを生成し、実行します。メッセージがコンテナ上の標準取得へ出力されます。
- dockerデーモンがメッセージをターミナルへ送信し、ターミナルはメッセージを表示します。
docker runコマンドの実行の流れで、イメージというコンテナを作成するためのものが取得され、コンテナのメッセージがdockerデーモンと通して、docker runコマンドを実行したターミナルへ取得する流れを追ってみました。少し長くなりそうなので、今回は、ここまでにして、次回は、コンテナの状態についてまとめていきたいと思います。
お疲れさまでした。